Managing multiple tracking codes across a single website creates unnecessary complexity, increases the risk of data discrepancies, and slows down page performance. Google recognized this problem and responded by consolidating its tracking infrastructure into a single library. Google Tag migration is the process of moving from fragmented, product-specific tags to this unified system (gtag.js), and it is now a critical project for any team serious about accurate measurement. This guide provides a technical walkthrough for marketing operations managers, SEO specialists, and data analysts who need to execute this migration without losing data or breaking conversion tracking.
You will find a clear breakdown of the unified tag's architecture, a phased audit and migration checklist, and proven troubleshooting techniques for the most common post-migration issues. Whether you are consolidating tags for a single property or managing dozens of accounts, this resource gives you the structure to get it right the first time.
The Foundation: What is the Unified Google Tag?
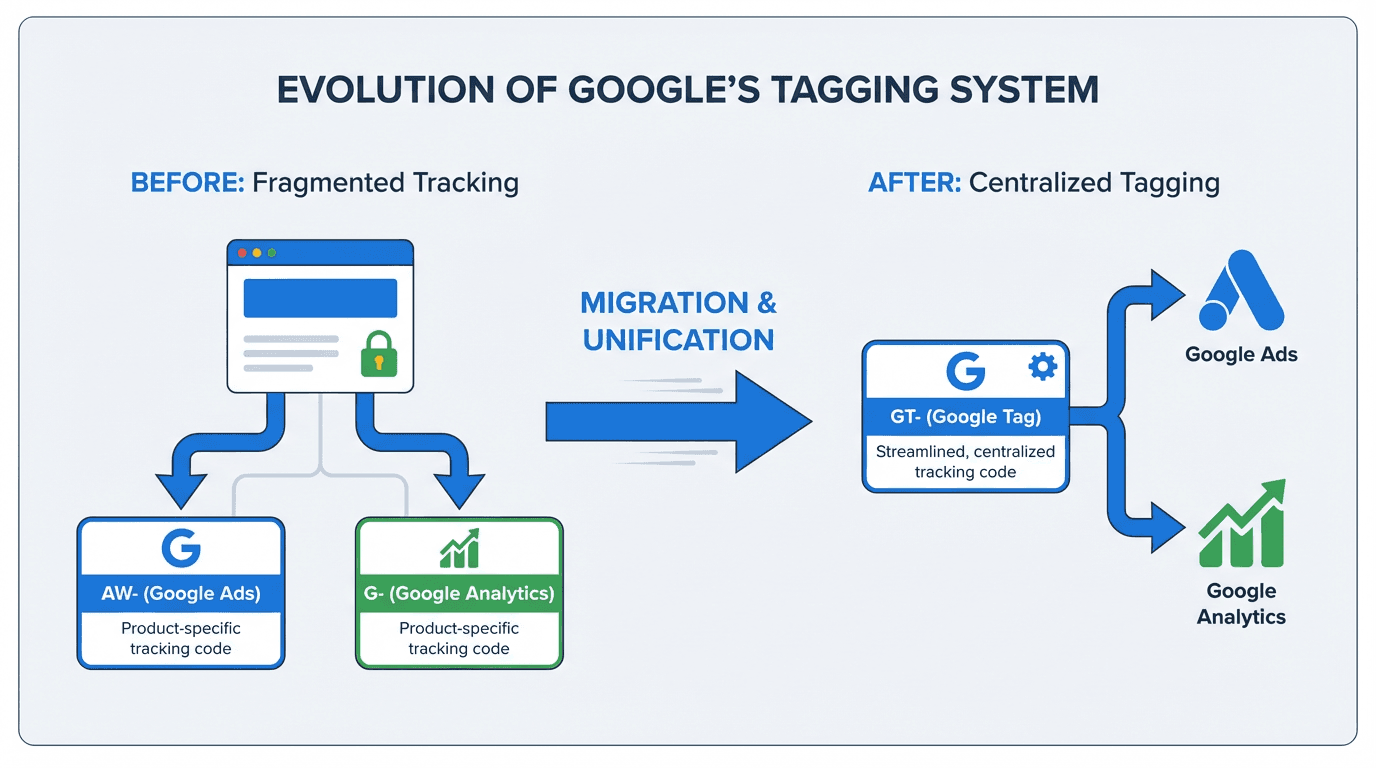
The Google Tag (gtag.js) is a single JavaScript library that handles data collection and routing across Google products, including Google Analytics 4 (GA4) and Google Ads. Before this consolidation, each service required its own dedicated tag. That fragmented approach meant redundant code on every page, higher maintenance overhead, and frequent mismatches between platforms. The unified Google Tag eliminates that problem. You install one script, and it acts as a central hub, sending data to multiple connected Google services (referred to as "destinations") from a single point of execution.
A critical distinction to understand early: the Google Tag (gtag.js) is not the same as Google Tag Manager (GTM). GTM is a tag management system that lets you deploy and control various tracking codes (the Google Tag, Meta Pixel, LinkedIn Insight Tag, and others) without editing your site's source code directly. The Google Tag is the specific script responsible for sending data to Google's own services. While you can place the Google Tag directly in your site's HTML, the recommended approach for most teams is to manage it within a Google Tag Manager container. This gives you version control, preview and debug capabilities, and the flexibility to manage all your tags from one interface.
Key advantages of the unified Google Tag:
- Single script, multiple destinations. One tag sends data to GA4, Google Ads, and other Google products simultaneously.
- Reduced code bloat. Fewer scripts on the page means faster load times and less interference with site performance.
- Centralized configuration. Shared settings (like cross-domain tracking or consent mode parameters) are configured once and applied everywhere.
- Future-proof architecture. Google's ongoing product updates and privacy features are built on this unified foundation.
Decoding the IDs: GT- vs. AW- vs. G-
The various ID formats are a common source of confusion during a Google Tag migration. Each prefix identifies a different destination within Google's ecosystem, and understanding what they mean is essential for configuring your unified tag correctly.
| ID Prefix | Origin | Primary Function |
|---|---|---|
| G- | Google Analytics 4 | Serves as a Measurement ID for a GA4 data stream, sending data to a specific GA4 property. |
| AW- | Google Ads | Acts as a Conversion ID for Google Ads, directing conversion and remarketing data to your Ads account. |
| GT- | Unified Google Tag | A Google Tag-specific ID that functions as a container for other destination IDs, created during setup or automatic conversion. |
| Each prefix identifies a specific destination for your website's tracking data. |
Existing Google Analytics (G-) and Google Ads (AW-) tags have been automatically upgraded into the new Google Tag format. This means a single Google Tag in your account can now contain multiple destination IDs, acting as one container for several services. This unified structure is the foundation for simplifying your tracking setup and is a standard checkpoint in any modern ecommerce SEO audit. When you open your Google Tag settings, you will see all connected destinations listed in one place, making it straightforward to verify that every service is receiving data.
Step-by-Step Audit and Migration Checklist
A successful Google Tag migration demands a methodical, phased approach. Rushing the process leads to data gaps, duplicate conversions, or broken event tracking. The following three-phase checklist gives you a repeatable framework for a clean transition.
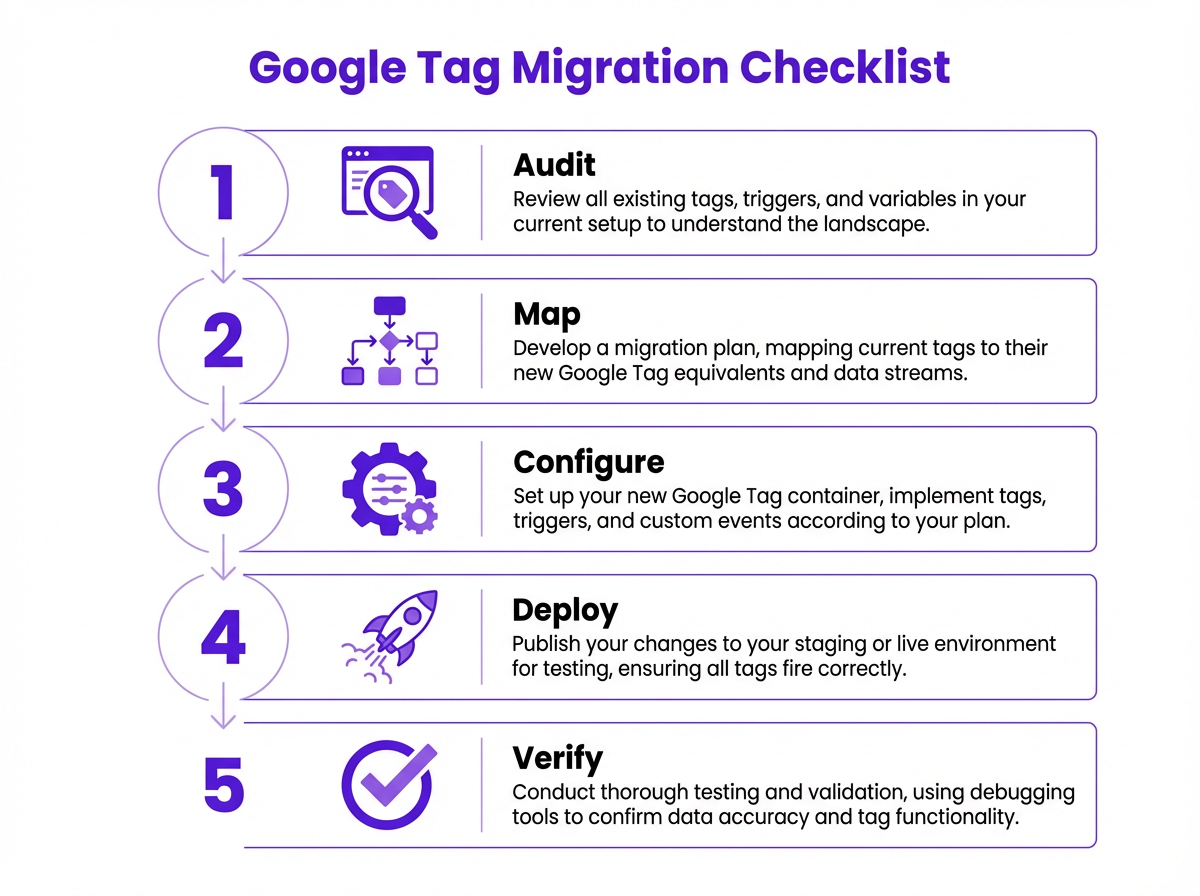
Phase 1: Pre-Migration Audit
Start by identifying every existing tag on your site. Inspect your site's source code or use browser developer tools (the Network tab filtered by "google" requests works well) to find any gtag.js or googletagmanager.com scripts. Record every ID you find, whether it uses a G-, AW-, or old UA- prefix. Next, document your current setup in a spreadsheet. Map every tag to the events it tracks (form submissions, purchases, page views, scroll depth), the custom parameters it sends, and the Google product it reports to. This spreadsheet becomes your migration blueprint and your post-launch verification checklist.
Phase 2: Migration Execution
Begin by consolidating your IDs. In the Admin section of your Google Analytics account, navigate to "Data Streams," select your web stream, and open your Google Tag settings. Here, you can combine your G- and AW- IDs under a single Google Tag. Inside your GTM container, create a new "Google Tag" tag type using your primary GT- or G- ID, and add other destination IDs (like your AW- ID) under "Shared event settings." Then, using your audit spreadsheet as a reference, recreate your event tracking with GTM's "GA4 Event" tag type, ensuring each event tag points to your new Google Tag. Install the GTM container on your staging site and remove any old, hardcoded gtag.js snippets to prevent double-tracking.
Phase 3: Verification and Launch
With the new setup on your staging site, validate every event and conversion path. Use GTM's Preview mode to confirm that tags fire on the correct triggers, and use GA4's DebugView to verify that events arrive with the right parameters and values. Cross-check conversion data against your audit spreadsheet to ensure nothing was missed. Once everything checks out, deploy the changes to your live site by publishing your GTM container and removing the old hardcoded tags from production code. After launch, monitor your live data for at least 48 to 72 hours, comparing it against pre-migration benchmarks to catch anomalies early.
Troubleshooting 'Ghost' Conversions and Data Discrepancies
Even with a careful migration, data discrepancies can surface. "Ghost" conversions (where analytics reports don't match your CRM or payment processor) are among the most frustrating post-migration issues. These problems typically stem from tracking gaps created by browser privacy features, ad blockers, or configuration errors introduced during the switchover. Studies from 2024 indicate that GA4 can undercount conversions by up to 40% compared to Google Ads' own tracking, primarily because GA4 relies on client-side signals that are increasingly blocked by browsers and extensions.
Use the following diagnostic steps to identify and resolve post-migration data issues:
- Use GA4 DebugView as your first diagnostic tool. Perform a test conversion and watch the event stream in real time. If the event doesn't appear, the tag isn't firing. If it appears with incorrect values, your parameters are misconfigured. This single step resolves the majority of post-migration issues.
- Cross-reference against your source of truth. Pull a report from your CRM or payment processor for a defined period. Compare the number of actual transactions with the conversions reported in GA4 and Google Ads. This tells you the scale and direction of the discrepancy.
- Check for duplicate tags. Having both the new GTM setup and old hardcoded tags on the same page is one of the most common causes of inflated metrics. Search your site's source code for any remaining legacy
gtag.jssnippets and remove them. - Verify your Consent Mode implementation. If you use a cookie consent banner, confirm it communicates correctly with your Google Tag. Improper Consent Mode settings can prevent tags from firing for users who haven't opted in, which causes significant undercounting.
- Evaluate server-side tagging for maximum accuracy. For businesses that require the highest level of data reliability, server-side tagging moves tag execution from the user's browser to your own server. This approach bypasses most client-side blockers and is becoming the standard for reliable attribution in privacy-conscious environments.
Key Takeaways for a Successful Migration
Completing a Google Tag migration is a foundational project for modernizing your analytics infrastructure. It reduces code complexity, improves data accuracy across platforms, and positions your measurement stack for the privacy-first direction of web tracking. The technical discipline required for this migration also pays dividends in related areas, from optimizing Google Ads copy to understanding how AI is changing SEO.
The core benefits are centralized control and a cleaner codebase. By consolidating tracking under one tag, you reduce page load overhead and simplify every future update. Keep an eye on Google's latest updates to stay ahead of changes that affect your tracking and reporting workflows.
Summary of migration best practices:
- Audit before you act. Document every existing tag, event, and custom parameter before touching your implementation.
- Consolidate under one Google Tag. Use a single GT- or G- ID as your primary tag and add other destinations within it.
- Test on staging first. Never deploy tag changes directly to production. Use GTM Preview mode and GA4 DebugView to validate everything.
- Remove all legacy code. Hardcoded gtag.js snippets left on the page will cause double-tracking and inflated metrics.
- Monitor post-launch for 48 to 72 hours. Compare live data against your pre-migration benchmarks to catch issues quickly.
Frequently Asked Questions
Do I have to migrate to the unified Google Tag?
While your old tags may still function, migration is highly recommended. The unified tag is Google's go-forward solution for web tracking, offering better integration and future feature support. Sticking with legacy tags will eventually lead to deprecated features and data gaps.
Can I have both Google Tag Manager and a hardcoded Google Tag on my site?
No, you should not. This can cause data duplication and conflicts. The best practice is to choose one implementation method. For most marketers, managing the Google Tag within Google Tag Manager offers the most flexibility and control.
What happens to my old GA4 Configuration tag in GTM?
It has been automatically converted into the new "Google Tag" type. No manual action is required for this specific change, but you should review the new tag's configuration to ensure it includes all necessary destination IDs, such as your Google Ads ID.
Will migrating affect my historical data in Google Analytics?
No, this migration affects how data is collected moving forward. Your historical data within Google Analytics will remain untouched. However, an incorrect migration can cause gaps or inaccuracies in data collection from that point onward.
How does the unified tag relate to consent mode?
The unified Google Tag is fully integrated with Google's Consent Mode. You can configure it to adjust its behavior based on user consent choices for analytics and advertising cookies, ensuring your tracking practices comply with regulations like GDPR and CCPA.
What is server-side tagging and when should I consider it?
Server-side tagging moves the execution of your tracking tags from the user's browser to a server you control. This reduces the impact of ad blockers and browser privacy restrictions, resulting in more complete data collection. It is especially valuable for businesses where conversion accuracy directly affects budget allocation decisions.
How do I verify that my Google Tag migration was successful?
Use GTM's Preview mode and GA4's DebugView to test every event and conversion on your staging environment before going live. After deployment, compare live data against your pre-migration benchmarks for at least 48 to 72 hours. Any significant drop or spike in event counts signals a configuration issue that needs immediate attention.